Shift is used to define the
desirable hours of work for a day. Shift setup is crucial as it is used to
calculate work hours, leave hours and shift allowances.
Shift is
used in Leave Hours calculations as well as in Roster Schedules.
There are
two types of Shifts:
-
Shift
that spans a single day. This is the most common type of shift, for example,
Day Shift can start at 8AM on a Monday and Finish at 5PM on Monday with 3
breaks within this period. See figure 2 below.
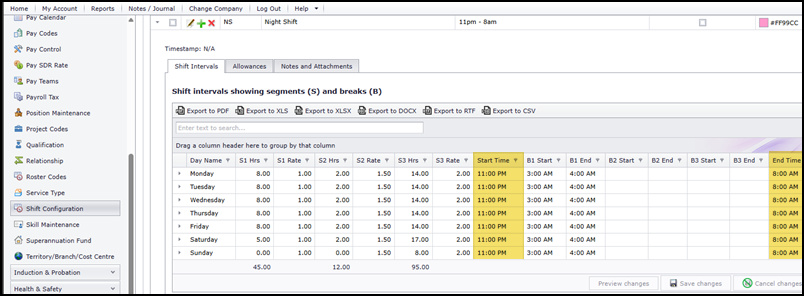
-
Shift
that spans two days. For example, Night Shift that starts at 11PM on a Monday,
and finishes at 8AM on the next day (Tuesday). See figure 3
below.
Notes
-
Shift
setup has three components:
-
Header
- Shift header describes the shift.
-
Time Control
-
Time
control
defines
the shift segments with a breakdown of the "Start Time", "End
Time" and "Breaks" for a day.
-
Shift
time is set using the 24hrs clock with a HH:MM format.
-
"Breaks"
added to a shift is not paid.
-
It
also
defines
the "Normal Hours", "Time and Half" and "Double Time" hours and rates
for day.
-
For
example, "Employee X" is assigned day shift. The setup for Monday
for day shift is as below.

-
According to the above setup if the employee
works 15 hours on a Monday, the pay rate will be as below:
-
Normal Hours (S1Hrs) = 8 hours x Pay Rate (S1Rate)
-
Time and Half (S2Hrs) =
2
hours x [Pay Rate x1.5] (S2 Rate)
-
Double Time (S3Hrs) =
5
hours x [Pay Rate x 2] (S3
Rate)
-
Work and leave hours are calculated based
on the shift segment for a day.
-
Shift
Allowance - allowances added to a shift will be paid to the employee in
every pay.
"Calculate Overtime on Totals" if enabled will calculate
overtime based on shift segment.
In
week 1, "Employee X" worked all days and worked for 9 hours per day. Overtime
will be calculated for the extra hours worked.
-
In
week
2, "Employee X" missed work on Monday and worked 12 hours for the rest of the
days. Overtime will not be calculated as employee did not work on Monday.
This reflects that "Overtime" is only calculated if an employee has worked
for total "Normal Hours" for a period.
Steps to Create a Shift:
Click on
the "Green Plus" sign to add a new shift. This will open the "Edit Form".
Refer to Figure 1.
-
Enter
the "Shift ID" and "Description".
"Shift
ID" is a unique alphanumeric code to uniquely identify each
Shift.
-
"Notes"
field is to enter additional details for the shift.
-
"Tick"
the "Calculate Overtime on Totals" check box to enable the feature.
-
Edit
the
record and "Un-tick" check box to disable feature.
-
Save
-
"Tick"
the "Void" check box to void a record.
- Void records will be "Disabled" and will not appear
in any lookups.
- Edit the record and "Un-tick" check box to
activate a record.
Steps to setup "Time
Control":
Time Control
-
Click on the "Grey Arrow" next to the Shift ID. This will open shift
"Time Control" details. Refer to Figure 2 .
-
Click on the "Pencil Icon" to edit the shift time
and break.
Time Control Details
(This is client
specific)
-
The shift setup allows users to setup a specific rate for a
certain time.Refer to Figure 2 .
-
For example, "Employee X" is assigned day shift
which starts and 8am and finishes at 5pm.However, the company has a policy
where employees starting work before the actual start time would be paid
double time.
-
For the above, scenario we need to define the
"Time Control Details".
-
Go into the time control details for a
day.
-
Click on the "Green Plus" sign. This will open
the "Edit Form"
- Sequence - This is the sequence of the rates
that must be used
- Time - Set the time for which the rate is
effective
-
Rate - Set the rate to be
paid.
-
Thus for the example in 2 above, time control
details setup would be"
-
Sequence = 1 , Time = 7am to 8am, Rate
= 2.
Sequence = 2, Time = 8am to 5am,
Rate = 1.
-
Employee would be paid double
rate for the 1st hour and paid is paid at rate 1 thereafter
Steps to setup
"Allowance":
-
Click on the "Grey Arrow" next to the Shift ID.
This will open shift "Allowance" setup.
-
Click on the "Green Plus" sign. This will open the
"Edit Form".
-
Select the allowance paycode.
Paycodes are maintained
in Payroll.
-
Enter the allowance amount.
-
Save.
-
"Tick" the "Void" check box to void a record.
- Void records will be "Disabled"
and will not appear in any lookups.
- Edit the record and "Un-tick"
check box to activate a
record.
Figure 1:
Shift Maintenance
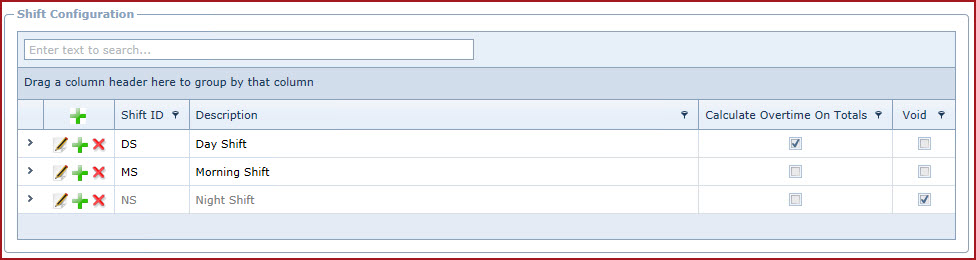
Figure 2: Shift - Time Control

Figure 3 : Night Shift
example